springboot博客(一)(环境搭建)
前言
这是一篇关于springboot的个人博客后端搭建详细过程,关于前端页面的编写这里不再详细赘述,但后端用到的thymeleaf渲染页面和一些关键jquery也会记录在内。话不多说,我们现在就开始吧!
关于具体搭建过程请移步到环境搭建、页面处理
技术选型:
- 后端:Spring Boot + JPA + thymeleaf模板
- 数据库:MySQL
- 前端UI:Semantic UI框架
工具与环境:
- IDEA
- Maven 3
- JDK 8
需求与功能
1.1 用户故事
用户故事是敏捷框架中的一种开发方法。可以帮助开发者转换视角,以用户的角度更好的把握需求,从而实现具有商业价值的功能。
用户故事模板:
- 作为一个(某个角色) 使用者,我可以做(某个功能) 事情,如此可以有(某个商业价值) 的好处
关键点:角色、功能、商业价值
举例:
- 作为一个招聘网站注册用户,我想查看最近3天发布的招聘信息,以便于了解最新的招聘信息。
- 作为公司,可以张贴新工作。
个人博客系统的用户故事:
角色:普通访客,管理员(我)
- 访客,可以分页查看所有的博客
- 访客,可以快速查看博客数最多的6个分类
- 访客,可以查看所有的分类
- 访客,可以查看某个分类下的博客列表
- 访客,可以快速查看标记博客最多的10个标签
- 访客,可以查看所有的标签
- 访客,可以查看某个标签下的博客列表
- 访客,可以根据年度时间线查看博客列表
- 访客,可以快速查看最新的推荐博客
- 访客,可以用关键字全局搜索博客
- 访客,可以查看单个博客内容
- 访客,可以对博客内容进行评论
- 访客,可以赞赏博客内容
- 访客,可以微信扫码阅读博客内容
- 访客,可以在首页扫描公众号二维码关注我
- 我,可以用户名和密码登录后台管理
- 我,可以管理博客
- 我,可以发布新博客
- 我,可以对博客进行分类
- 我,可以对博客打标签
- 我,可以修改博客
- 我,可以删除博客
- 我,可以根据标题,分类,标签查询博客
- 我,可以管理博客分类
- 我,可以新增一个分类
- 我,可以修改一个分类
- 我,可以删除一个分类
- 我,可以根据分类名称查询分类
- 我,可以管理标签
- 我,可以新增一个标签
- 我,可以修改一个标签
- 我,可以删除一个标签
- 我,可以根据名称查询标签
1.2 功能规划
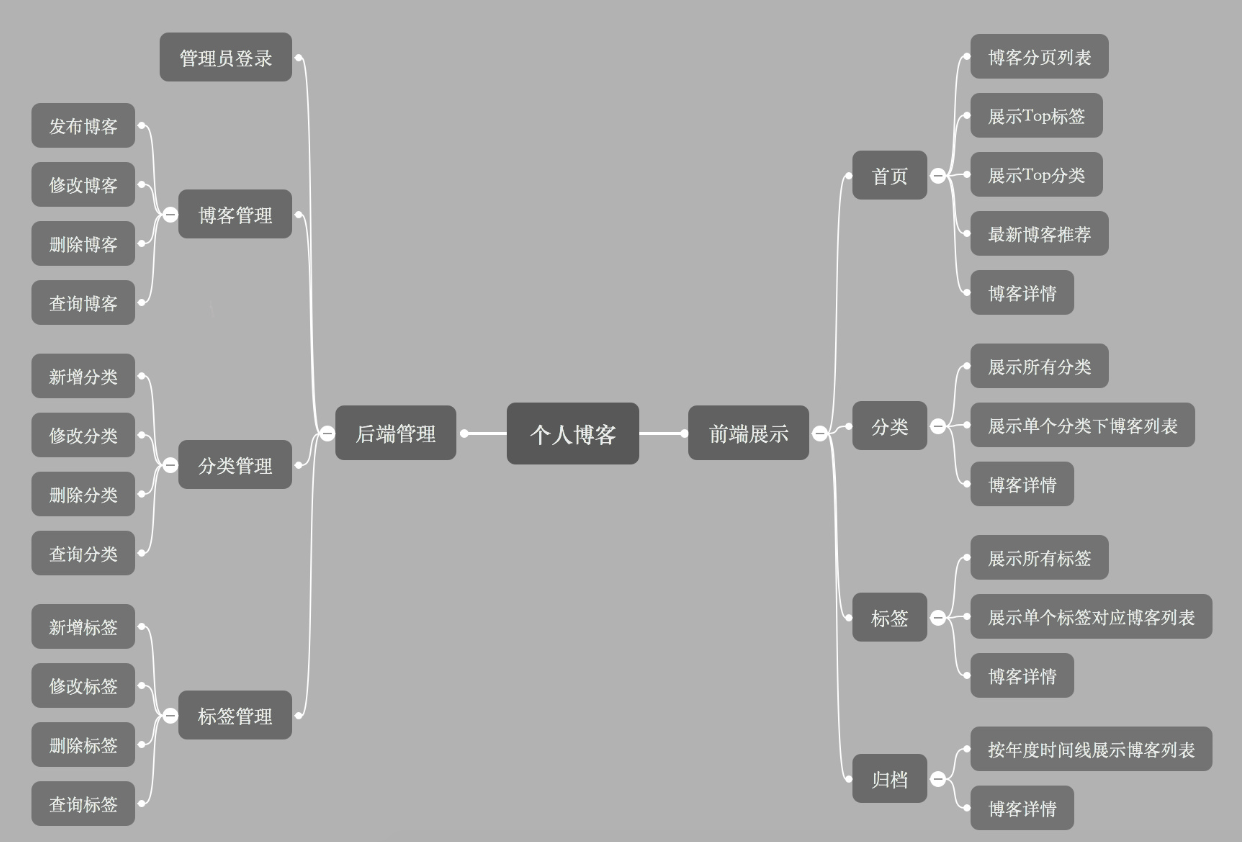
2、页面设计与开发
2.1 设计
页面规划:
前端展示:首页、详情页、分类、标签、归档、关于我
后台管理:登录页、后台首页、博客、分类、标签
2.2 页面开发
2.3 插件集成
环境搭建、页面处理
1. 环境构建
创建springboot工程,jdk8
引入模块
- web
- Thymeleaf
- JPA
- Mysql
- Aspects
- DevTools
    <parent>
        <groupId>org.springframework.boot</groupId>
        <artifactId>spring-boot-starter-parent</artifactId>
        <version>1.5.7.RELEASE</version>
        <relativePath/> <!-- lookup parent from repository -->
    </parent>

    <properties>
        <project.build.sourceEncoding>UTF-8</project.build.sourceEncoding>
        <project.reporting.outputEncoding>UTF-8</project.reporting.outputEncoding>
        <java.version>1.8</java.version>
        <!--这里thymeleaf使用3.x的版本-->
        <thymeleaf.version>3.0.2.RELEASE</thymeleaf.version>
        <thymeleaf-layout-dialect.version>2.1.1</thymeleaf-layout-dialect.version>
    </properties>

    <dependencies>
        <dependency>
            <groupId>org.springframework.boot</groupId>
            <artifactId>spring-boot-starter-aop</artifactId>
        </dependency>
        <dependency>
            <groupId>org.springframework.boot</groupId>
            <artifactId>spring-boot-starter-data-jpa</artifactId>
        </dependency>
        <dependency>
            <groupId>org.springframework.boot</groupId>
            <artifactId>spring-boot-starter-thymeleaf</artifactId>
        </dependency>
        <dependency>
            <groupId>org.springframework.boot</groupId>
            <artifactId>spring-boot-starter-web</artifactId>
        </dependency>


        <dependency>
            <groupId>com.atlassian.commonmark</groupId>
            <artifactId>commonmark</artifactId>
            <version>0.10.0</version>
        </dependency>

        <dependency>
            <groupId>com.atlassian.commonmark</groupId>
            <artifactId>commonmark-ext-heading-anchor</artifactId>
            <version>0.10.0</version>
        </dependency>
        <dependency>
            <groupId>com.atlassian.commonmark</groupId>
            <artifactId>commonmark-ext-gfm-tables</artifactId>
            <version>0.10.0</version>
        </dependency>

        <dependency>
            <groupId>org.springframework.boot</groupId>
            <artifactId>spring-boot-devtools</artifactId>
            <scope>runtime</scope>
        </dependency>
        <dependency>
            <groupId>mysql</groupId>
            <artifactId>mysql-connector-java</artifactId>
            <scope>runtime</scope>
        </dependency>
        <dependency>
            <groupId>org.springframework.boot</groupId>
            <artifactId>spring-boot-starter-test</artifactId>
            <scope>test</scope>
        </dependency>
    </dependencies>
配置文件application.yml
spring:
  thymeleaf:
    mode: HTML
  profiles:
    active: dev
application-dev.yml
需要提前创建好数据库
spring:
  datasource:
    driver-class-name: com.mysql.jdbc.Driver
    url: jdbc:mysql://localhost:3306/myblog?useUnicode=true&characterEncoding=utf-8
    username: root
    password: 1234
  jpa: #所有Jpa的配置项都在jpaProperties中
    hibernate:
      ddl-auto: update #更新或创建数据表结构
    show-sql: true #控制台显示sql
logging:
  level:
    root: info
    top.jm: debug
  file: log/myblog-dev.log
application-pro.xml
spring:
  datasource:
    driver-class-name: com.mysql.jdbc.Driver
    url: jdbc:mysql://localhost:3306/myblog?useUnicode=true&characterEncoding=utf-8
    username: root
    password: 1234
  jpa:
    hibernate:
      ddl-auto: none
    show-sql: true
logging:
  level:
    root: warn
    top.jm: info
  file: log/myblog-pro.log
SpringBoot中有日志默认的生成以及切分,在这里我们可以重写SpringBoot默认日志配置,自定义日志大小和名称等等,在资源文件夹下添加logback-spring.xml进行配置
2. 异常处理
在页面访问的时候,会有一些比较常见的异常报错信息,比如路径无法访问404异常、服务器错误500异常以及自己定义的错误页面等等,SpringBoot框架提供了处理错误页面的方法,在这里,咱们对404、500、error异常页面进行处理。
在
resources/templates下创建error文件夹,创建404/500/error.html,springboot在出现该状态码时会自动在该目录找该页面在
templates文件夹下创建index.html,用于测试创建controller,跳转测试用
@Controller
public class ExceptionController {
    @GetMapping("/")
    public String indexController(){
        //int i = 1/0;
        return "index";
    }
}
小知识:
因为导入了devtools的jar包,我们可以实现热部署,重编译运行就可以了

跳转error.html的方法
对于404和500错误页面,SpringBoot可以根据页面的命名方式找到对应的文件,而自定义的错误就需要我们自己来拦截了,让代码出现问题的时候跳转到我们自己定义的错误页面,这里就需要自定义拦截器。
创建拦截器,拦截所有controller请求
@ControllerAdvice//表示拦截controller的所有请求
public class ControllerExceptionHandler {
    private final Logger logger =
            LoggerFactory.getLogger(ControllerExceptionHandler.class);//创建日志对象
    @ExceptionHandler({Exception.class})//表示这是个异常处理的拦截器
    public ModelAndView exceptionHandler(HttpServletRequest request,Exception e){
        logger.error("Request URL:{},Exception:{}",request.getRequestURL(),e);
        ModelAndView modelAndView = new ModelAndView();
        modelAndView.addObject("url",request.getRequestURL());
        modelAndView.addObject("exception",e);
        modelAndView.setViewName("error/error");//这样路径会识别到templates下的路径
        return modelAndView;
    }
}
错误页面信息显示(便于开发时在页面看到错误)
- 在error.html中加上
<div>
<div th:utext="'<!--'" th:remove="tag"></div><!--这里是转义,即“<--”注释的开头,这样在界面就不会显示,开发人员开启控制台的原代码就能看到异常信息-->
<div th:utext="'Failed Request URL : ' + ${url}" th:remove="tag">
</div>
<div th:utext="'Exception message : ' + ${exception.message}"
th:remove="tag"></div>
<ul th:remove="tag">
<li th:each="st : ${exception.stackTrace}" th:remove="tag"><span
th:utext="${st}" th:remove="tag"></span></li>
</ul>
<div th:utext="'-->'" th:remove="tag"></div>
</div>
让404仍然跳转到404.html,而不是所有异常都跳转error.html
修改异常(测试用)
@GetMapping("/")
public String indexController(){
    //int i = 1/0;
    String blog = null;
    if(blog == null){
        throw new NotFindException("blog是null");
    }
    return "index";
}
创建异常类在myblog包内
@ResponseStatus(HttpStatus.NOT_FOUND)//表示这个状态码是404
public class NotFindException extends RuntimeException {

    public NotFindException(String message) {
        super(message);
    }

    public NotFindException(String message, Throwable cause) {
        super(message, cause);
    }

    public NotFindException() {
    }
}
自定义拦截器中增加
//如果异常信息是404,就抛出去给springboot来处理,自己的拦截器不拦截
if(AnnotationUtils.findAnnotation(e.getClass(), ResponseStatus.class)!=null){
    throw e;
}
3. 日志处理
效果
每发送一个请求,控制台就打印日志
2020-11-30 10:50:25.544 INFO 16016 --- [nio-8080-exec-2] top.jm.myblog.aspect.LogAspect : request:{}RequestLog{url='http://localhost:8080/', ip='0:0:0:0:0:0:0:1', classMethod='top.jm.myblog.controller.IndexController.indexController', args=[Page request [number: 0, size 5, sort: id: DESC], {}]}
步骤
采用spring的aop来实现日志处理,AOP可以以切面的形式拦截,将日志内容记录下来,这里记录以下日志信息:
- 访问的URL
- 访问者的IP
- 访问时调用的方法
- 访问时传递的参数
- 访问时返回的内容
创建一个切面类
@Aspect
@Component
public class LogAspect {
    //获取日志对象
    private final Logger logger = LoggerFactory.getLogger(this.getClass());
    //切面
    @Pointcut("execution(* top.jm.myblog.controller.*.*(..))")
    public void log(){
    }
    //前置方法
    @Before("log()")
    public void doBefore(JoinPoint joinPoint){
        //获取request对象
        ServletRequestAttributes attributes = (ServletRequestAttributes) RequestContextHolder.getRequestAttributes();
        HttpServletRequest request = attributes.getRequest();
        //获取信息
        String url = request.getRequestURL().toString();//获取url
        String ip = request.getRemoteAddr();//获取ip
        String method = joinPoint.getSignature().getDeclaringTypeName()+"."+joinPoint.getSignature().getName();//获取方法名
        Object[] args = joinPoint.getArgs();//获取请求参数
        RequestLog requestLog = new RequestLog(url,ip,method,args);//封装并用日志输出
        logger.info("request:{}"+requestLog);
        //logger.info("--------before--------");
    }
    //后置方法
    @After("log()")
    public void doAfter(){
        //logger.info("--------after----------");
    }
    //返回值方法
    @AfterReturning(pointcut = "log()",returning = "result")
    public void doAfterReturning(Object result){
       // logger.info("return-----{}",result);
    }
    //用于封装log信息
    private class RequestLog{
        private String url;
        private String ip;
        private String classMethod;
        private Object[] args;

        public RequestLog(String url, String ip, String classMethod, Object[] args) {
            this.url = url;
            this.ip = ip;
            this.classMethod = classMethod;
            this.args = args;
        }

        @Override
        public String toString() {
            return "RequestLog{" +
                    "url='" + url + '\'' +
                    ", ip='" + ip + '\'' +
                    ", classMethod='" + classMethod + '\'' +
                    ", args=" + Arrays.toString(args) +
                    '}';
        }
    }
}
修改controller(测试用)
    @GetMapping("/{id}/{name}")
    public String indexController(@PathVariable("id") int id,@PathVariable("name") String name){
        logger.info("-------index--------");
        return "index";
    }
4. 页面处理
静态页面导入project
- 将templates、static导入进去
- 使用maven的clean清除target缓存
- 重新运行通过controller访问Index.html
- 发现有些样式和图片没有引进,需要修改thymeleaf路径
th:href="@{/css/me.css}"th:src="@{images/wechat.jpg}"
thymeleaf公共布局抽取
作用:将公共布局抽取到一个页面中,修改公共页面,即修改所有样式
模板:
th:fragment=""- 传参:
th:fragment="模板名(参数名)" - 使用参数:
th:replace="${参数名}"
引用:
th:replace="模板所在的html名::模板名"(将表标签内及自己全部替换为模板)传参:
th:replace="模板所在的html名::模板名(参数)"传参的过程:
- 引用的参数传给模板
- 模板进行接收参数进行渲染
- 渲染好的模板返回给引用
参数格式:
~{ templatename :: selector }支持:
~{ templatename :: #html_id }表示 取 html 的 id 标签~{ ::selector}表示 代码段在本页面~{ templatename }引入 templatename 所有的 html 代码
建立公共页面
_fragment.html抽取和使用fragment
head的抽取
<head th:fragment="head(title)"> <meta charset="UTF-8"> <meta name="viewport" content="width=device-width, initial-scale=1.0"> <title th:replace="${title}">博客详情</title> <link rel="stylesheet" href="https://cdn.jsdelivr.net/semantic-ui/2.2.4/semantic.min.css"> <link rel="stylesheet" href="../static/css/typo.css" th:href="@{/css/typo.css}"> <link rel="stylesheet" href="../static/css/animate.css" th:href="@{/css/animate.css}"> <link rel="stylesheet" href="../static/lib/prism/prism.css" th:href="@{lib/prism/prism.css}"> <link rel="stylesheet" href="../static/lib/tocbot/tocbot.css" th:href="@{/lib/tocbot/tocbot.css}"> <link rel="stylesheet" href="../static/css/me.css" th:href="@{/css/me.css}"> </head><head th:replace="_fragment::head(~{::title})"></head>分析:
- 模板抽取,参数为title
- 引用时,传入参数
~{::title},表示引用的title标签作为参数传入模板 - 模板的
th:replace="${title}"渲染上值 - 渲染后的模板替换到引用的位置
nav导航的抽取
<nav class="ui inverted attached segment m-padded-tb-mini m-shadow-small" th:fragment="nav(n)"> <div class="ui container"> <div class="ui inverted secondary stackable menu"> <h2 class="ui teal header item">Blog</h2> <a href="#" class="m-item item m-mobile-hide" th:classappend="${n==1}?'active':''"><i class="mini home icon"></i>首页</a> <a href="#" class="m-item item m-mobile-hide" th:classappend="${n==2}?'active':''"><i class="mini idea icon"></i>分类</a> <a href="#" class="m-item item m-mobile-hide" th:classappend="${n==3}?'active':''"><i class="mini tags icon"></i>标签</a> <a href="#" class="m-item item m-mobile-hide" th:classappend="${n==4}?'active':''"><i class="mini clone icon"></i>归档</a> <a href="#" class="m-item item m-mobile-hide" th:classappend="${n==5}?'active':''"><i class="mini info icon"></i>关于我</a> <div class="right m-item item m-mobile-hide"> <div class="ui icon inverted transparent input m-margin-tb-tiny"> <input type="text" placeholder="Search...."> <i class="search link icon"></i> </div> </div> </div> </div> <a href="#" class="ui menu toggle black icon button m-right-top m-mobile-show"> <i class="sidebar icon"></i> </a> </nav><nav th:replace="_fragment::nav(1)" class="ui inverted attached segment m-padded-tb-mini m-shadow-small" > </nav>
底部footer的抽取
<footer th:fragment="footer" class="ui inverted vertical segment m-padded-tb-massive"> ... </footer><footer th:replace="_fragment::footer" class="ui inverted vertical segment m-padded-tb-massive"> </footer>script抽取
<th:block th:fragment="script">
<script src="https://cdn.jsdelivr.net/npm/jquery@3.2/dist/jquery.min.js"></script>
<script src="https://cdn.jsdelivr.net/semantic-ui/2.2.4/semantic.min.js"></script>
<script src="//cdn.jsdelivr.net/npm/jquery.scrollto@2.1.2/jquery.scrollTo.min.js"></script>

<script src="../static/lib/prism/prism.js" th:src="@{lib/prism/prism.js}"></script>
<script src="../static/lib/tocbot/tocbot.min.js" th:src="@{lib/tocbot/tocbot.min.js}"></script>
<script src="../static/lib/qrcode/qrcode.min.js" th:src="@{lib/qrcode/qrcode.min.js}"></script>
<script src="../static/lib/waypoints/jquery.waypoints.min.js" th:src="@{lib/waypoints/jquery.waypoints.min.js}"></script>
</th:block>
<!--/*/<th:block th:fragment="script">/*/--> <script src="https://cdn.jsdelivr.net/npm/jquery@3.2/dist/jquery.min.js"></script> <script src="https://cdn.jsdelivr.net/semantic-ui/2.2.4/semantic.min.js"></script> <!--/*/</th:block>/*/-->这里的/*/:在html中是注释的存在,但是在thymeleaf模板中,仍然有效
- 传参:
错误页面美化
<!DOCTYPE html>
<html lang="en" xmlns:th="http://www.w3.org/1999/xhtml">
<head th:replace="_fragment::head(~{::title})">
    <meta charset="UTF-8">
    <meta name="viewport" content="width=device-width, initial-scale=1.0">
    <title>首页</title>
    <link rel="stylesheet" href="https://cdn.jsdelivr.net/semantic-ui/2.2.4/semantic.min.css">
    <link rel="stylesheet" href="../static/css/me.css" th:href="@{/css/me.css}">
</head>
<body>

<!--导航-->
<nav th:replace="_fragment::nav(0)" class="ui inverted attached segment m-padded-tb-mini m-shadow-small" >
    <div class="ui container">
        <div class="ui inverted secondary stackable menu">
            <h2 class="ui teal header item">Blog</h2>
            <a href="#" class="active m-item item m-mobile-hide"><i class="mini home icon"></i>首页</a>
            <a href="#" class="m-item item m-mobile-hide"><i class="mini idea icon"></i>分类</a>
            <a href="#" class="m-item item m-mobile-hide"><i class="mini tags icon"></i>标签</a>
            <a href="#" class="m-item item m-mobile-hide"><i class="mini clone icon"></i>归档</a>
            <a href="#" class="m-item item m-mobile-hide"><i class="mini info icon"></i>关于我</a>
            <div class="right m-item item m-mobile-hide">
                <div class="ui icon inverted transparent input m-margin-tb-tiny">
                    <input type="text" placeholder="Search....">
                    <i class="search link icon"></i>
                </div>
            </div>
        </div>
    </div>
    <a href="#" class="ui menu toggle black icon button m-right-top m-mobile-show">
        <i class="sidebar icon"></i>
    </a>
</nav>
<br>
<br>
<br>
<div class="m-container-small m-padded-tb-massive">
    <div class="ui error message m-padded-tb-huge">
        <div class="ui container"></div>
        <h1>404</h1>
        <p>对不起,您访问的资源不存在!</p>
    </div>
</div>
<br>
<br>
<br>

<!--底部footer-->
<footer th:replace="_fragment::footer" class="ui inverted vertical segment m-padded-tb-massive">
    <div class="ui center aligned container">
        <div class="ui inverted divided stackable grid">
            <div class="three wide column">
                <div class="ui inverted link list">
                    <div class="item">
                        <img src="../static/images/wechat.jpg" th:src="@{images/wechat.jpg}" class="ui rounded image" alt="" style="width: 110px">
                    </div>
                </div>
            </div>
            <div class="three wide column">
                <h4 class="ui inverted header m-text-thin m-text-spaced " >最新博客</h4>
                <div class="ui inverted link list">
                    <a href="#" class="item m-text-thin">用户故事(User Story)</a>
                    <a href="#" class="item m-text-thin">用户故事(User Story)</a>
                    <a href="#" class="item m-text-thin">用户故事(User Story)</a>
                </div>
            </div>
            <div class="three wide column">
                <h4 class="ui inverted header m-text-thin m-text-spaced ">联系我</h4>
                <div class="ui inverted link list">
                    <a href="#" class="item m-text-thin">Email:lirenmi@163.com</a>
                    <a href="#" class="item m-text-thin">QQ:865729312</a>
                </div>
            </div>
            <div class="seven wide column">
                <h4 class="ui inverted header m-text-thin m-text-spaced ">Blog</h4>
                <p class="m-text-thin m-text-spaced m-opacity-mini">这是我的个人博客、会分享关于编程、写作、思考相关的任何内容,希望可以给来到这儿的人有所帮助...</p>
            </div>
        </div>
        <div class="ui inverted section divider"></div>
        <p class="m-text-thin m-text-spaced m-opacity-tiny">Copyright © 2016 - 2017 Lirenmi Designed by Lirenmi</p>
    </div>

</footer>
</body>
</html>
功能实现
1. 设计与规范
我们根据面向对象编程的思想,先建立实体类,利用JPA根据实体类生成对应的数据库。
1.1 实体类
- 博客Blog
- 博客分类Type
- 博客标签Tag
- 博客评论Comment
- 用户User
实体关系

评论类自关联关系

Blog类
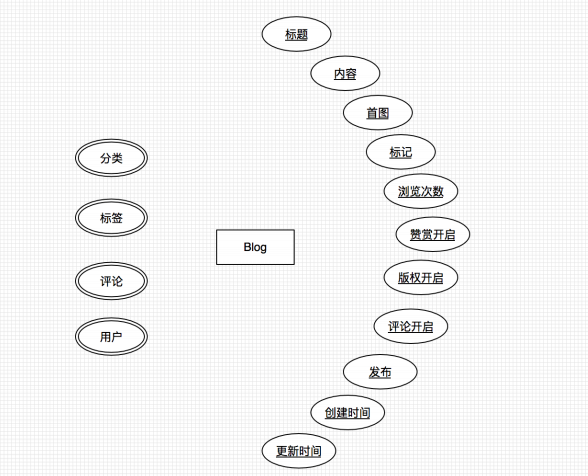
Type类

Tag类

Comment类
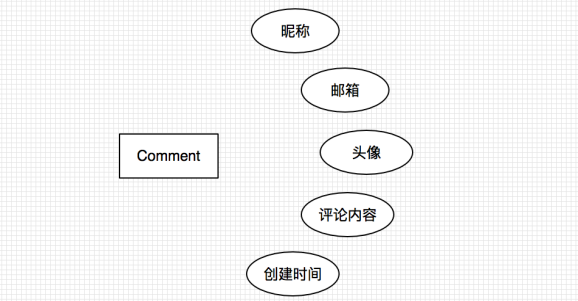
User类
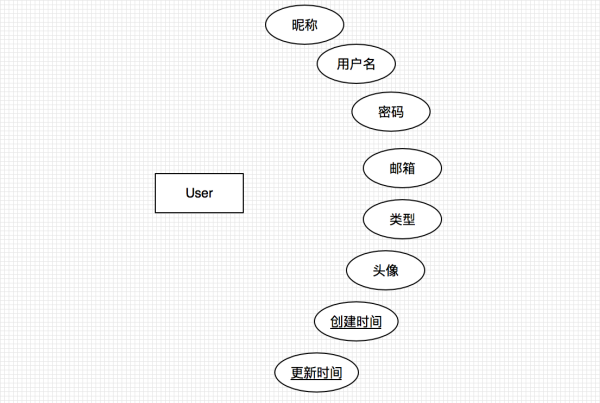
1.2 应用分层
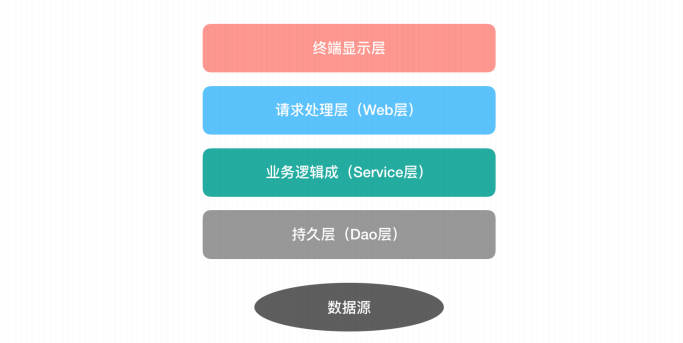
1.3 命名约定
Service/Dao层命名约定:
- 获取单个对象的方法用get作前缀
- 获取多个对象的方法用list作前缀
- 获取统计值的方法用count作前缀
- 插入的方法save或insert作前缀
- 删除的方法用remove或delete作前缀
- 修改的方法用update作前缀
2. 实体类构建
创建实体类
配置实体关系
声明对象变量
指明一对多/多对多关系,并表示“多”为维护方
注意几点:
- @Table别忘了加name,虽然爆红,但不影响使用
- @GeneratedValue指明id生成策略
- Date需要指明@Temporal时间戳
- @ManyToOne:多对1,1对多的关系界定:当前实体类和对方的关系。并且1的一方需要指明被谁维护mappedBy
- 记得加上引用对象的get/set方法
- @ManyToMany级联新增
@Entity//指明实体类
@Table(name = "t_blog")//指明映射哪个表
public class Blog {

    @Id//标记主键
    @GeneratedValue//主键的生成策略,默认自增
    private Long id;
    private String title; //标题
    private String content;//内容
    private String firstPicture;//首图
    private String flag;//标记
    private Integer views;//浏览次数
    private boolean appreciation;//赞赏开启
    private boolean shareStatement;//版权开启
    private boolean commentabled;//评论开启
    private boolean published;//发布
    @Temporal(TemporalType.TIMESTAMP)//表示是一个完整的时间
    private Date createTime;//创建时间
    @Temporal(TemporalType.TIMESTAMP)
    private Date updateTime;//更新时间

    @ManyToOne//多个博客属于1个类型
    private Type type;
    @ManyToMany(cascade = {CascadeType.PERSIST})//级联新增,当新增一个tag,数据库也会跟着新增
    private List<Tag> tags = new ArrayList<>();//list的需要new
    @ManyToOne
    private User user;
    @OneToMany(mappedBy = "blog")//“1”的一方需要被“多”的维护:mappedBy指:被维护
    private List<Comment> comments = new ArrayList<>();
启动项目,自动生成表


